Monday, December 21, 2009

Pineapple Up-side Down Cornmeal Cake!!


This recipe was SUPER special, since I was able to make it for Thanksgiving and ALSO that Thanksgiving was spent in Italy this year. Well technically we were in Poland for Thanksgiving, but we improvised and had Thanksgiving dinner 2 days early at my Sister and Brother-in-laws house in Aviano, Italy. We were on vacation for 2 weeks and were able to spend time with family and travel Europe and taste ALL kinds of delicious food! More about that later, though.

My recipe for this week was Pineapple Up-side down cornmeal cake, BREATH, whew that is a long name! I love pineapple and love cake even more, so I knew right away that I would love this recipe! I had to multi-task while making this recipe because at the same time I was helping Angela with our Thanksgiving feast! So I'll leave out all the parts where I stopped to make greenbean casserole and Angela giving me a crash course on how to peel vegetables with a knife instead of a peeler (I'm spoiled)!

First thing to do was to place the milk in a microwave-proof dish and bring it to a boil. Let me just say that European microwaves are weird! You have to turn them off, otherwise when you open the door they keep going! Anyway, once your milk starts boiling you add in the cornmeal and let it sit at room temperature for 30 minutes. This was helpful since, as said above, I was helping with other dishes for our feast that evening. Once I was done with my other duties, though, I took the butter and melted it in a cast iron skillet over the stove. Once the butter was melted I added in my brown sugar. NOW here is the part that tripped me up! The recipe says wait for the sugar to dissolve (about 5 minutes). Well I waited and was expecting the sugar to completely dissolve and become a syrup...which didn't happen! So I thought I would leave it a little longer and maybe it would dissolve. NO, it didn't happen...all the sudden Angela and I start smelling this awful burning smell and yes you guessed it, I burned the sugar! Who burns sugar?? That's almost like burning water!! Anyway, I burned the sugar and it was hell trying to get it off the cast iron skillet, but it worked and luckily I had the PERFECT amount of brown sugar left to start over. Funny enough, when I was done with the first batch I almost threw the brown sugar away because there wasn't much left. Thank goodness I didn't because I needed every little granule that was left!

Round 2, I was much luckier and realized that brown sugar doesn't dissolve like white sugar. It will be a little bit thicker consistancy. Just be sure to look out for this if you attempt this recipe! After you perfect your sugar mixture, just remove the cast iron skillet from the heat and now the decorative part comes in! I placed 1 slice of pineapple in the center of the pan and then around that placed the other 5 slices to make a pretty flower pattern. Then in each of the pineapple circles, I put a maraschino cherry perfectly in the middle. OF COURSE I had to taste test the pineapple and cherries just to make sure they were edible for everyone else! This is HIGHLY recommended when making this recipe. After you make your pretty "flower", you take 1/3 of a cup of chopped pecans and sprinkle it like fairy dust on top of the pineapple, sugar, cherry-yummy goodness! Then if that wasn't good enough, you take 3 T of your pineapple juice and drizzle it all over to top it off.

I let my pretty flower pattern sit while I sifted, in a separate bowl, my flour, baking powder, and salt. If you don't have a sifter handy, just whisk through it really good to combine everything and get any lumps out. In another bowl (yes there are a LOT of bowls in the recipe which bro-in-law Jason can attest too. He did the dishes that night...Sorry Jason) I whisked my eggs together. Before I continue, make sure your egg bowl is a big one because this is the bowl that you use to combine all your other bowls together in. Continuing along, to the eggs I added the sugar and incorporated that in fully, then it was time for the canola oil to join the party! After that the cornmeal and milk mixture (the FIRST bowl I made in the microwave and let sit) gets into the mix of things. By this time your arm MIGHT be tired, but you aren't quite done whisking yet! Add all of the "party" bowl to your flour bowl and whisk away!!! It's ok if there are lumps, you just want to make sure to combine everything.

Once everyone had joined the party in 1 bowl, I poured the mixture into the skillet on top of my pretty flower pattern and into the oven it went. You bake it at 350 degrees for 40-45 minutes. Once I removed it from the oven, it was really hard, but I had to let it sit for 30 minutes before trying to flip it over (hence the name pineapple upside-down cornmeal cake). At the end of 30 minutes though, I have to admit, I was a little nervous to try and flip the cake. I am not the most coordinated person in the world, so Adam was there to save the day! He flipped the cake flawlessly onto the platter and all the yummy buttery sugar ooey-gooey stuff ran over the top of the cake and it looked beautiful!

It was the perfect ending, along with pumpkin pie, to the most perfect Thanksgiving I have ever had! Angela made the best turkey I have ever eaten and we had every side you could ever think of! We were all stuffed and happy at the end of the night!

*As a special treat I will post pictures of some of the food we experienced while in Europe!! Buon Appetito!!

Recipe Rating: Easy
Good Leftover: Yes, just be sure to cover with saran wrap, so it doesn't dry out
Tip: Beware of hot cast iron skillet! It can be super dangerous, so have oven mits handy at all times!
Stay tuned in 2 weeks- Lemon-Ginger Frozen Yogurt

You can find the Pineapple upside-down cornmeal cake recipe here:
http://www.foodnetwork.com/recipes/alton-brown/pineapple-upside-down-cornmeal-cake-recipe/index.html

Tuesday, November 24, 2009

No cow in this pie!


This week I did things a little differently. Instead of making it on Sunday night, I did the recipe on Thursday. The reason I did this was because Adam and I were leaving to go out of the country and were going to be gone on Thanksgiving. My Dad and Glenda invited us over for dinner to celebrate early, so I figured it was the perfect time to make my moo-less chocolate pie.

This pie scared me a little bit at the beginning when I read it was made from tofu. I've never had tofu, but have heard some stories that weren't so pleasant about tofu. BUT this is all about making and trying new things, so I pushed my way through it. (FYI the enter is for you Ang and J...shoutout!). So first I started with a metal mixing bowl over a saucepan with simmering water in it (in essence a homemade double boiler) and melted the chocolate chips and kahlua together. I really wanted to stop here and just eat the melted chocolate and Kahlua, but didn't think everyone else would appreciate eating pie crust for dessert. Once the chocolate was melted down I added in 1t of vanilla and stirred it all together. Quickly (so the choc. didn't harden) I placed the rest of the ingredients in a blender, silken tofu & 1T of honey. Make sure you empty the water out of the tofu before you place it in the blender. After this, I placed the melted chocolate mixture in the blender with the tofu and honey and blended everything together until it was creamy.

Instead of making the pie crust this recipe called for pre-made chocolate wafer crust. I had only ever heard of vanilla wafers so had no clue where to find a chocolate wafer crust. I looked up and down the cookie isle to see if chocolate wafers even existed. I found the chocolate sugar wafers, but no chocolate cookie wafers. I then made my way over to the pie crust isle and found a chocolate cookie pie crust and just convinced myself this is what the recipe meant by chocolate wafer crust. So once the mixture was creamy I simply poured it into the pre-made pie crust and made the journey to my Dad's house.

Once we got there, I placed the pie in the fridge and it calls for it to sit 2 hours in the fridge. This was perfect because it gave us time to eat and chat before we had dessert. Glenda and Dad made the perfect meal! We had chicken parmesan, zucchini wth a tomatoe sauce, mashed potaoes and rolls. It was the perfect pre-Thanksgiving meal!

We pulled the pie out of the fridge and my Dad and Adam has the first pieces. I was a little worried because no one was saying anything at first. It seemed like an eternity but finally they all assured me it was delicious. Believe it or not Adam, who doesn't even like sweets, said that this was his favorite recipe I have made from the book to date. So sorry Pressure Cooker Chili, you got trumped! Everyone said it tasted almost like a chocolate mousse and agreed it would be best paired with a cup of coffee. A huge thanks to Dad and Glenda for having us over and agreeing to try tofu pie!!

I will definitely be making this pie again! I might not tell people prior to eating what ALL the ingredents are, but hopefully after trying it and me letting them know it is healthy for them, they will have more of an open mind when it comes to unconventional ingredients.

Recipe Rating: SUPER Easy
Good Leftover: Great, but make sure to cover with saran wrap overnight so it doesn't dry out.
Tip: Have a cup of hot joe at hand when eating, because this pie is RICH!
Stay tuned in 2 weeks- Pineapple Upside-Down Cornmeal cake

You can find the Moo-less Chocolate Pie recipe here:

Friday, November 6, 2009

English Muffins


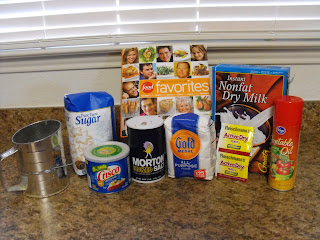
This week was a little different because instead of an entree, I had a breakfast recipe to tackle. I have to admit this was my least favorite recipe I have done so far! I prefer a recipe that is a little more complex and has a few more working pieces, I'll get to that shortly and you'll understand why. So this past weekend was Halloween and we were having a Halloween party as well as some friends come into town. So I figured why not have this weeks recipe on Saturday morning instead of the morning after Halloween when we are all tired and just want to sleep in. So that is what we did! One of my best friends Brittney, her 2 girls and her Sister A'Lisha and her boyfriend all came into town Friday night and stayed the weekend with us. It worked out perfectly because Brittney lives about 2hrs away and has wanted to be a part of one of my recipes! This time I went to Wal-Mart Neighborhood Store instead of Kroger, since we were having a party and I could just get everything there for a little bit cheaper than Kroger. So I woke up on Saturday morning ready to get started and I wasn't as prepared for this recipe as I thought I was. Usually I'll sit down the day before and read through the recipe just making sure I understand everything and have everything I need. I just skimmed through it this time because I had so many other things going on at the time. BIG MISTAKE! Come to find out, the recipe calls for metal rings to pour your batter in on the griddle to make sure it keeps its round shape and plumps up all pretty. It gives you a tip to use a tuna can and just clean it out and cut the tops and bottoms off for a do-it-yourself metal ring. So I bought 1 tuna can and the first problem I ran in to is that I didn't read closely enough that the tuna can needs to have a flat, crimped top and bottom. So, luckily I have an innovative husband and he pulled out his knife and was able to cut the bottom off my tuna can. Whew, so problem solved right? NO! Next I start reading and see that each muffin takes 5-6 minutes on EACH side to cook. So do the math...I had 5 people staying with me plus Adam and I, so a total of 7 people times 11minutes and if each person had 2 muffins and I only had 1 tuna can well I would be in the kitchen for a VERY long time making english muffins. So, on to innovation number 2...my Aunt sends home from Alabama every time my Mom goes and visits, cans of fresh green beans, tomatoes, etc...in those mason jars with the pop tops and the rings that screw on around them. I decide to use these tiny little rings and we can just deal with mini and regular sized english muffins. Of course looking back, I should have 1. thoroughly read the recipe before beginning or 2. instead of getting tuna cans, just have bought round metal rings! It was ok though, it made the meal a little more interesting and is a funny story to tell...now. Once we figured out the ring situation, it was time to start actually making the muffins. First I combined my powdered milk (which I have never even noticed at the store before), sugar, shortening and hot water with 1/2t salt and stirred until the sugar and salt were dissolved and then I set this aside to cool. While this was cooling, in a separate bowl I mixed my 1 envelope of yeast (Ok, funny story is that I was thinking how is an envelope a measurement? Am I going to have to buy an envelope, this is confusing? No worries though the packages the yeast come in are "envelopes". It was my "blonde" cooking moment) with 1/8t sugar (I STILL don't understand the point of having 1/8 of anything) and warm water. Then you also have to set this aside until the yeast dissolves, about 10 minutes. Sounds super exciting huh? So far you just mix and set things aside! Once the yeast was dissolved I poured it in with the powdered milk mixture. Then in a THIRD bowl I sifted my 2C of flour and added this into the party with the rest of the ingredients. My favorite part was what came next, I got to BEAT it with a wooden spoon until I got all the lumps out! It was a great stress reliever to say the least!! After that you just cover the bowl and let it rest in a warm spot for 30 minutes. During this time I got my griddle out and heated it up to 300 degrees. I placed my metal rings on the griddle, sprayed them with good old Pam, and learned a valuable lesson that you DO NOT touch anything metal if it is placed on something that is 300 degrees! I already knew this, I just think that Murphey's Law was in FULL effect during this recipe. So anyway, once my griddle was heated and my mixture had set I added the remaining 1/2t salt and got to beat it again, FUN!! Then I took an ice cream scoop and dipped out 2 scoops for my tuna can and 1 scoop for my mason jar rings and then covered with a cookie sheet and pot lid and then I waited for 5-6 minutes and flipped the rings and mixture over with tongs and let it cook on the opposite side for another 5-6minutes. You just repeat this process until all your mixture is gone. You might want to re-spray your Pam on your rings after the first few you make. This lasted for about 45 minutes until I was completely done with the mixture! Needless to say I only got 1 picture of the girls enjoying their English muffins, because everyone ate at scattered times. Luckily I had wonderful sous chefs and Adam made yummy sausage patties and Brittney made fried (over easy) eggs. So we had runny, yummy, English muffins. Brittney did say it was the kind of food you want to eat in private because you felt so savage due to how messy it was! We all had a good time, I survived my burns (yes plural, I decided to touch the metal pot lid, cookie sheet and rings not once or twice but 3 times! UGH!) and everyone either lied to me because they felt sorry for everything I went through that morning or they really did enjoy the English muffins! Brittney's girls assured me that their "pancakes" were yummy too. They are too cute! Either way, I thought they were good, but this type of recipe as simple as it may be is not my forte at all! I just hope I didn't scare Brittney and her girls away and they'll come back for another recipe sometime!

Recipe Rating: Easy
Good Leftover: Not sure, we didn't have any left. I'm sure they would be though!
Tip: Read any recipe before starting, THOROUGHLY and NEVER touch hot metal!
Stay tuned in 2 weeks- Moo-Less Chocolate Pie

You can find the English Muffin recipe here:
http://www.foodnetwork.com/recipes/alton-brown/english-muffins-recipe/index.html

Thursday, October 22, 2009

A WHOLE lot of fish!


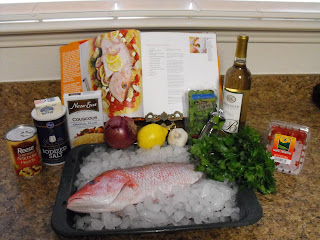
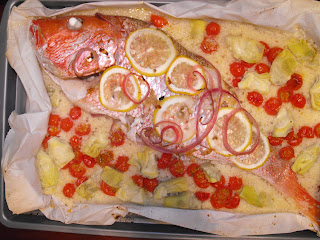
This weeks recipe was Red Snapper in Papillote. What is a Papillote, you ask? It's ok, I didn't know either until I started this recipe. Basically cooking in Papillote is French for "Cooking in Parchment Paper". So don't worry it isn't some crazy, exotic ingredient you have to search the Earth's end for. This week all starting at....NOT KROGER! I know, it's hard to believe, but rest assured I did get most of the ingredients from Kroger still. It all started at, Central Market, a new and wonderful place that I can't believe I didn't know about until now. It is located in Ft. Worth off I30 and Hulen. Adam and I went there to get the Red Snapper because this recipe didn't just call for Red Snapper meat, it called for the WHOLE fish! I was a little freaked out about this because last time I remember eating a whole fish was when my family and I lived in Georgia, when I was 9 years old and our church held a fish fry. Afterwards we all went to McDonalds because we just couldn't eat anything that was staring at us! So I just had to repress that memory and push forward with the recipe since this whole idea was to challenge myself. Anyway, back to Central Market, I was so amazed with everything there I actually asked Adam if we could live inside the store. Their meat, seafood, gelato, produce, even pears (which I didn't think I liked until I went there) were so fresh and delicious. So if you are out to make a special meal or even a regular day to day meal, I would definitely recommend Central Market. I'm sure you will hear me talk about Central Market a lot more as I get deeper into my cookbook, so I'll save some raving for another post. We went to the fish counter and ordered the Red Snapper (about 2.5lbs). When you are looking for a Red Snapper you want a firm-fleshed fish with bright red skin, red gills, and clear eyes. Also, the fish shouldn't smell fishy, it should smell like the ocean. The "fish man" cleaned the fish for us, which consists of de-scaling the fish and cutting off its fins and gills, which helps out a lot, so be sure to ask them to do this for you. I knew the Red Snapper would be a little pricey just because you are ordering a whole fish, but it wasn't THAT bad (it was about $10/lb). So after Adam was able to drag me out of Central Market, we made our way to Kroger and picked up the rest of the ingredients. Once we got home I made sure to turn my oven on 450 degrees, so it was all ready to go when I was. I went ahead and got my couscous started too. Let me say I have had couscous once before and wasn't thrilled with it at all. It tasted to me, the way that cardboard smells, so I was also a little apprehensive about this ingredient too. On the upside it is SUPER easy to make. Just take about 1 cup of couscous and pour very hot water over it and let it sit for about 10 minutes. While I was waiting on my couscous, I rolled and cut out about 4ft of parchment paper and folded it in half (hamburger style), placing half on a cookie sheet and the rest hanging off (so you can fold it over the cookie sheet when you are done prepping everything). Next I laid my fish diagonal on the parchment paper, on the cookie sheet, and seasoned it with salt and pepper outside AND inside the fish. After your fish is seasoned you take 1 small bunch, each, of fresh oregano and fresh parsley and just stuff it inside of the fish. I prefer the flat leaf italian parsley over the curly parsley-the kind you see that is used to decorate plates in restaurants. At this point I went ahead and sliced my lemon and red onion into thin slices. Take half of the slices of each the lemon and red onion and also stuff this inside the cavity of the fish. Your fish should look "full" at this point and your couscous should be about done, go ahead and drain your couscous and season it with a pinch of salt. With the extra water in my couscous drained out, I placed it all around my fish, on the cookie sheet, in a thin layer. Then I used my handy dandy garlic press and pressed about 2 cloves of garlic to get 2t and placed on top of my fish with the rest of my lemon and red onion slices. I'm really picky, so I had to arrange them all so it looked pretty. I truly believe you "eat" with your eyes, then your nose and then your mouth. Next I cut my grape tomatoes in half and instead of having to quarter my artichokes I bought them pre-quartered, in the can. I'm glad it didn't call for fresh artichokes because I would have to google how to clean and prepare those! You spread the tomatoes and artichokes evenly all over the couscous. Last but not least you take 3/4cup of white wine (I used a Pinot Grigio) and pour it all over your fish and then take 1T of butter and put the "period" on your recipe and dot your fish with the butter. It sounds like a lot of steps, but if you do your prep work before (all the chopping) it takes about 15min to do, including the 10min for the couscous. After everything is prepped and pretty, you fold that extra 2 ft of parchment paper over your fish and seal to create an almost air tight seal. This allows the white wine and the juices in the fish and vegetables to steam and cook everything through. I didn't have one, but you can use a stapler to help you create that air tight seal. Then just throw everything in the oven and cook for about 30min (turning your cookie sheet once). When your fish is done, be careful when you open up the papillote, because the steam will come pouring out and will be HOT! Also, don't be scared when you see the eyeballs on the fish! They "burst" out a little and will be white. I have to admit I got a lump in my throat when I saw its eyeballs, but it was mind over matter. This week it was just my Mom, Adam and I that got to enjoy this feast. None of us really knew how to eat a whole fish, so we just dug right in, avoiding anything close to the head at all costs! Make sure you are careful for bones, especially the little, sharp ones that can really cut you. Just chew slowly and use your fork to "inspect" before you eat. I have to say, the fish was really delicious and Adam and my Mom agreed!! I still am not a HUGE fan of couscous but the salt, tomatoes and artichokes helped make it easier to eat. Adam, on the other hand, doesn't like couscous in any form or fashion, so a good substitute for this recipe would be rice or even cheese grits. So overall, I can now eat a whole fish without apprehension and enjoy it! Although, I still prefer the headless, skinless, boneless kind!

Recipe Rating: Easy (all you do it stuff, season & cook)
Good Leftover: No more than 1 day old
Tip: Go into this recipe with an OPEN mind, you will be pleasantly surprised!
Stay tuned in 2 weeks- English Muffins

You can find the Red Snapper in Papillote recipe here:
http://www.foodnetwork.com/recipes/alton-brown/red-snapper-en-papillote-recipe/index.html
Wednesday, October 7, 2009

Pig out on City Ham!


Sunday was the first recipe I have ever been nervous about making. It was a City Ham! The only reason is because I had to cook a WHOLE ham and have never done this before. The closest I have ever been was making a Thanksgiving turkey, which always turned out great. So even though I had some nerves, I felt confident because of how past turkey's have turned out for me. We invited over my Dad and Glenda & Andy and Sonja for this recipe and it turned out perfect because I had a true critic there. Glenda doesn't even like ham and she is always honest, so I knew she would be my toughest critic to impress! This time around I didn't start my journey at Kroger, instead it was at the liquor store! No, I wasn't so nervous that I had to go and buy some booze to help...the recipe actually called for bourbon. So off I went into the liquor store and Adam and I definitely looked like fish out of water. We had about 3 employees ask us if we needed help as we just stood staring at the bourbon section trying to decide what to get. We finally found these tiny little bottles of bourbon and I used Jim Beam. Then it was off to Kroger to get the ham and all the other yummy ingredients (brown mustard, brown sugar & gingersnap cookies). The first place I stop is at the meat counter and ask the guy if they have city ham. He looks at me with a puzzling look and said, "Well I've heard of country ham, but what's city ham". In my head I'm thinking, aren't you suppose to know, you are the meat guy!! So I tell him it's just a whole ham with hock end on and he says that those are seasonal only during Thanksgiving and Christmas and run about $60! So after picking Adam's jaw up off the floor, we strolled over through the meat section and low and behold there sits a whole ham by the bacon. The only difference between this and what I needed was, it cost less and was partially cooked (hickory smoked). So we grabbed that, since I couldn't wait until Thanksgiving (side note: I'll be in Italy then, WOHOO) and finished getting the rest of the ingredients. Also a side note: All brown mustard is labeled "spicy" brown mustard. Anyway, on to Sunday morning...I started the ham about 10:45 in order to get it into the oven by 11:00 because it said it would take about 5hrs to cook and then 30min to rest. First thing you have to do is give the ham a good little rinse and then place it in a roasting pan (put a towel at the bottom to allow it to drain and to help keep it from sliding during the next step). Next, I took a small pairing knife and "scored" the ham. Basically this is starting at the right "corner" of the ham and making a small incision, if you will, from bottom to top in a diagonal direction. Then once you make it all the way around the ham, start at the left side in the opposite direction and repeat. This should make pretty little diamond patterns all over your ham. Be sure you are only cutting through the layer of skin and first couple of layers of fat, don't cut too deep. Then you place your handy thermometer in the ham and stick it in the oven at 250 degrees for about 4 hours or until the thermometer reads 130 degrees. Don't forget to wash your hands after this step, no one likes Escherichia coli (E. Coli)!! Once the ham reaches 130 degrees take it out of the oven, remove the thermometer (note: they get hot, so use a hot pad) and use tongs to peel away the skin/fat diamonds all over the ham. My tongs aren't great, so this took me about 5 minutes to do. Finally I just grabbed a small knife to help my tongs out. Then take your brown mustard and use a basting brush or brand new paint brush to liberally apply the mustard onto the ham. The next few steps are the messy part...you then take the dark brown sugar and sprinkle a light layer on top of the mustard and pack in slightly as you go around. You WILL get messy during this and if you are anything like me have the lotion handy because you will wash your hands 100 times! After your brown sugar, you take 1oz of your bourbon and spritz (I used one of those 80 cent spritzer bottles in the cosmetic section at Kroger) it all over the ham. Then take your gingersnap cookies and crush them up (I used my blender because I don't have a food processor) and apply to ham in the same fashion as the brown sugar until the ham is covered. Then put your thermometer back into your ham (don't use the same hole as before) and turn the oven up to 350 degrees and bake for another hour or until your ham reaches 140 degrees. This is the only problem I ran in to. I probably should have only done 3 hrs in the morning for my ham because within about 5 minutes my ham was at 140 degrees so I just turned the oven down and kept it warm in order to let all that yummy goodness I put on it crust up. Once that is done, just remove it from the oven and let it sit for about 30 minutes. A lot of people don't know that you need to let meat rest before cutting into it, otherwise all the juices and flavors that you worked so hard at getting will just run out all over the place and you'll have a dry piece of meat. I served my ham with fresh rolls from Kroger's bakery and asparagus wrapped in phillo dough with fresh parmesan sprinkled on top. My father-in-law brought apple pie for dessert, so it was quite the feast. Everyone, including Glenda LOVED the ham and we even had enough to send both my Dad/Glenda and Adam's parents home with the rest!!! After it was all said and done, there was no reason to be nervous. All I had to do was cut, peel, baste and cook the ham. No tricky ingredients or fancy techniques needed!

Recipe Rating: Easy
Good Leftover: VERY
Tip: I would recommend doing this recipe during the Holiday's when the REAL city (or country) ham's are out. It will for sure be a crowd pleaser!!
Stay tuned in 2 weeks- Red Snapper en Papillote

You can find the City Ham recipe here:
http://www.foodnetwork.com/recipes/alton-brown/city-ham-recipe/index.html

Monday, September 21, 2009

Eggplant Pasta!


Yesterday was Eggplant Pasta day! So far, this was the only recipe I was nervous to make because I have never worked with nor made anything using eggplant. My sister-in-law was the first to introduce me to this delicious vegetable, so who better to be our guests of honor than her, my brother and my nephew! We had to do a luncheon instead of dinner b/c Cris works nights, but it worked out PERFECT! As usual, the recipe started Saturday with a trip to Kroger. I did my research on eggplants and come to find out there are male and female eggplants. Here is a little education, when choosing your eggplant, if you decide to make this recipe or anything using eggplant for that matter. First you want to choose an eggplant with tight skin, no wrinkles or blemishes, the calyx (top hard part) is bright green and has a nice clean cut. Then if it's a little heavy in size and you press it with your finger and it bounces right back, that's a good start! BUT the bigger the pod is, the seedier it is, meaning the more bitter it will taste, so stick with the medium sized ones. Lastly, the difference between the female and male eggplant is the shape of the "belly-button" OR that top hard part (the calyx). The female has an oval "belly-button" and the male has a round "belly-button". It's best to try and get a male eggplant b/c they have fewer seeds and as stated above are less bitter. Anyway, moving right along to Sunday mornings preparation first things first was to get the eggplant peeled and purged. I had to look up what purging an eggplant meant...don't worry it's not some crazy eggplant bulimia diet! Basically you peel the eggplant (leaving about 1in of skin at the top and bottom) and then you slice it lengthwise into 1/4 inch layers and lay out on a wire rack on top of a cookie sheet. Then you take kosher salt and evenly sprinkle it on the eggplant and let the eggplant purge for about 30min. I did 30min, but would recommend doing about 45-1hr if you are patient enough. This removes all the juices from the eggplant (therefore making your sauce less runny, which I will get to shortly). Then you give them a quick rinse and paper towel them off before slicing them into fettuccini like pieces. OH YES, you were thinking pasta WITH eggplant weren't you?! OH NO, this was full out eggplant as the pasta, so cool! So after that you heat your oil, garlic and red pepper flakes in your skillet (I used a small stock pot b/c I doubled the recipe. If you know my brother, you know why) and heat up until the garlic is SLIGHTLY brown. I say this b/c while my garlic was heating up I was cutting the tomatoes and completely forgot about my garlic and BLACK garlic=nasty food. So we had a take 2 on the oil, garlic and red pepper flakes. Second time was a charm. Once it's heated up add your eggplant "pasta" and toss to coat it and cook for about 3-5 minutes. Then you add your diced tomatoes & heavy cream and increase your heat to let your sauce thicken. This bring me back to the purging of the eggplants...my sauce wasn't as thick as I wanted it to be so I improvised and added about 1 T of Corn starch and it made it a lot better! So being patient during the purge is definitely a must! Once your sauce is thick, throw in your fresh parmigiano reggiano and your chiffonade basil (chiffonade is just a fancy way to cut your basil into ribbons. Simply stack the leaves, roll them up together and cut) and WAHLAH you have Eggplant Pasta! I served the pasta with a fresh salad and toasted french bread. Scot, Cris, Kai and myself all LOVED it and had seconds. Adam on the otherhand almost took the literal meaning of purging an eggplant and just had salad and bread for lunch. He wasn't a fan of eggplant before so we expected that reaction from him! So this recipe definitely isn't for picky eaters! A big thanks to Scot, Cris and Kai for joining us for lunch and I hope you enjoy the leftovers!

Recipe Rating: Easy
Good Leftover: According to Scot, yes. BUT as he said he LOVES leftovers and eats them cold. So you'll have to be the judge on this one.
Tip: Patience is a virtue when purging eggplants! Leave yourself plenty of time for this process!
Stay tuned in 2 weeks- City Ham

You can find the Eggplant Pasta recipe here:
http://www.foodnetwork.com/recipes/alton-brown/eggplant-pasta-recipe/index.html

Monday, August 31, 2009

Pressure Cooker Chili


Last night was Pressure Cooker Chili night! I was really excited to do this recipe because I have never used a Pressure Cooker before! Luckily instead of having to buy one, my Father-in-law who is also an AMAZING cook had one that he let me borrow. As you can probably guess our guests of honor last night were my Mother, my Nephew and my amazing 2nd parents Sonja and Andy! Once again all the ingredients were bought at Kroger (Side note: Kroger should really pay me for as much as I advertise them!) EXCEPT Chipotle Peppers in Adobo sauce. This is where the adventure begins. My Mom and I looked EVERYWHERE at Kroger and couldn't find this ingredient (this was Saturday), so figured we would go on Sunday to Tom Thumb and surely they would have it, right? Well of course, we go and search Tom Thumb high and low and even ask Customer Service for help and the 16-yr-old that informed us in all his years working there (1 year) he has never even heard of this ingredient. I said I knew what it looked like and it does exist, just can't find it. So after he took us up and down every isle we had already looked on, we called Adam (who usually can provide me some insight as to where to go) and he said to try Whole Foods or La Michoacana. He highly suggested La Michoacana because he thought he had seen them there before. Of course we start on our way to Whole Foods, because I wasn't too excited about going to "Mexico" where if we ran into any problems between my Mom and I, no one could help us because all we can say is Si and No! BUT on the way I had a feeling and Adam is usually right about these things so we stopped at La Michoacana and BAM...first isle my Mom and I walked on it was right in front of us and looked as if a light from Heaven was shining on it, leading us towards it! Ok not really, but that's how I felt because I really needed this ingredient, it was a main component to the dish! So anyway, enough about Chipotle peppers in Adobo sauce! I got home and the first thing you do is take the 3lbs of meat out of the package and put it in a large bowl and mix it with the peanut oil and salt. Just incase you didn't know I hate touching raw meat, this is usually Adam's job when we are cooking, but this is all about challenging myself, so I just went for it! My hands were freezing because the meat was so cold and I was totally disgusted but it was over quickly! Next you are suppose to heat your pressure cooker to high (lid off) and place the meat in there to brown in 3 batches (so basically 1lb per batch). So I go to place the first batch and WOW, it looked like I was trying to burn the house down! It started smoking uncontrollably and the fire alarm went off, I couldn't see anything, Kai was saying "shut it off" to the fire alarm, my Mom was saying "What's wrong" and Adam was scrambling to shut off the fire alarm and open the back door! No worries though, I stayed put and probably got a little smoke inhalation and browned that first batch of meat REALLY good! HA! It was over in a matter of minutes and I turned the heat down. So word to the wise, when it says to place it on high, I would do maybe between a 6 and 7! The next 2 batches went smoothly and browned perfectly! I then took the meat out and you are suppose to use a "medium ale" beer to de-glaze the brown goodness on the bottom. Backtracking a little, when I was at Kroger I asked about 3 men at the beer station what a good "medium ale" beer is and of course they had no clue and looked at my like I was crazy! Where is a beer connoisseur when you need them? UGH! So I just went with some Hawaiian Pale Ale beer I saw. Once you de-glaze everything you throw the rest of your ingredients into the pot and shut the lid. Wait until is hisses and then turn the heat down to a low simmer and cook for 25 minutes. Super easy to do and cooks really quickly! After the 25 minutes I opened the lid and this is really a recipe you shouldn't judge by its cover. It looked like dog food, but smelled delicious! So we all sat down around the table and dug in. I provided either bread, saltines or tortilla chips to go along with it. First bite was a surprise to all, it was really spicy! Of course I LOVE spicy food, but everyone else doesn't have taste buds of steel like I do, so they added extra crackers/chips/bread to theirs to soften the blow of the heat. I then went around the table and did a little survey of what everyone thought of the recipe, what they would change, etc...The general concensus was that they would cut the meat into smaller cubes and maybe do a few tweaks to the ingredients for next time, but overall it was a hit! Adam even said it was his favorite recipe of all the 3 I have done so far. So success with yet another recipe!

Recipe Rating: Easy
Good Leftover: Yes, actually a little better because all the ingredients have time to meld
Tip: Have a fan readily available, in case of heavy smoke
Stay tuned in 3 weeks- Eggplant Pasta

You can find the Pressure Cooker Chili recipe here:
http://www.foodnetwork.com/recipes/alton-brown/pressure-cooker-chili-recipe/index.html