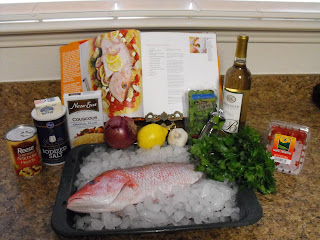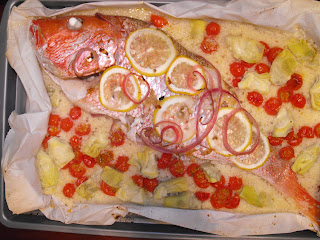


This weeks recipe was Red Snapper in Papillote. What is a Papillote, you ask? It's ok, I didn't know either until I started this recipe. Basically cooking in Papillote is French for "Cooking in Parchment Paper". So don't worry it isn't some crazy, exotic ingredient you have to search the Earth's end for. This week all starting at....NOT KROGER! I know, it's hard to believe, but rest assured I did get most of the ingredients from Kroger still. It all started at, Central Market, a new and wonderful place that I can't believe I didn't know about until now. It is located in Ft. Worth off I30 and Hulen. Adam and I went there to get the Red Snapper because this recipe didn't just call for Red Snapper meat, it called for the WHOLE fish! I was a little freaked out about this because last time I remember eating a whole fish was when my family and I lived in Georgia, when I was 9 years old and our church held a fish fry. Afterwards we all went to McDonalds because we just couldn't eat anything that was staring at us! So I just had to repress that memory and push forward with the recipe since this whole idea was to challenge myself. Anyway, back to Central Market, I was so amazed with everything there I actually asked Adam if we could live inside the store. Their meat, seafood, gelato, produce, even pears (which I didn't think I liked until I went there) were so fresh and delicious. So if you are out to make a special meal or even a regular day to day meal, I would definitely recommend Central Market. I'm sure you will hear me talk about Central Market a lot more as I get deeper into my cookbook, so I'll save some raving for another post. We went to the fish counter and ordered the Red Snapper (about 2.5lbs). When you are looking for a Red Snapper you want a firm-fleshed fish with bright red skin, red gills, and clear eyes. Also, the fish shouldn't smell fishy, it should smell like the ocean. The "fish man" cleaned the fish for us, which consists of de-scaling the fish and cutting off its fins and gills, which helps out a lot, so be sure to ask them to do this for you. I knew the Red Snapper would be a little pricey just because you are ordering a whole fish, but it wasn't THAT bad (it was about $10/lb). So after Adam was able to drag me out of Central Market, we made our way to Kroger and picked up the rest of the ingredients. Once we got home I made sure to turn my oven on 450 degrees, so it was all ready to go when I was. I went ahead and got my couscous started too. Let me say I have had couscous once before and wasn't thrilled with it at all. It tasted to me, the way that cardboard smells, so I was also a little apprehensive about this ingredient too. On the upside it is SUPER easy to make. Just take about 1 cup of couscous and pour very hot water over it and let it sit for about 10 minutes. While I was waiting on my couscous, I rolled and cut out about 4ft of parchment paper and folded it in half (hamburger style), placing half on a cookie sheet and the rest hanging off (so you can fold it over the cookie sheet when you are done prepping everything). Next I laid my fish diagonal on the parchment paper, on the cookie sheet, and seasoned it with salt and pepper outside AND inside the fish. After your fish is seasoned you take 1 small bunch, each, of fresh oregano and fresh parsley and just stuff it inside of the fish. I prefer the flat leaf italian parsley over the curly parsley-the kind you see that is used to decorate plates in restaurants. At this point I went ahead and sliced my lemon and red onion into thin slices. Take half of the slices of each the lemon and red onion and also stuff this inside the cavity of the fish. Your fish should look "full" at this point and your couscous should be about done, go ahead and drain your couscous and season it with a pinch of salt. With the extra water in my couscous drained out, I placed it all around my fish, on the cookie sheet, in a thin layer. Then I used my handy dandy garlic press and pressed about 2 cloves of garlic to get 2t and placed on top of my fish with the rest of my lemon and red onion slices. I'm really picky, so I had to arrange them all so it looked pretty. I truly believe you "eat" with your eyes, then your nose and then your mouth. Next I cut my grape tomatoes in half and instead of having to quarter my artichokes I bought them pre-quartered, in the can. I'm glad it didn't call for fresh artichokes because I would have to google how to clean and prepare those! You spread the tomatoes and artichokes evenly all over the couscous. Last but not least you take 3/4cup of white wine (I used a Pinot Grigio) and pour it all over your fish and then take 1T of butter and put the "period" on your recipe and dot your fish with the butter. It sounds like a lot of steps, but if you do your prep work before (all the chopping) it takes about 15min to do, including the 10min for the couscous. After everything is prepped and pretty, you fold that extra 2 ft of parchment paper over your fish and seal to create an almost air tight seal. This allows the white wine and the juices in the fish and vegetables to steam and cook everything through. I didn't have one, but you can use a stapler to help you create that air tight seal. Then just throw everything in the oven and cook for about 30min (turning your cookie sheet once). When your fish is done, be careful when you open up the papillote, because the steam will come pouring out and will be HOT! Also, don't be scared when you see the eyeballs on the fish! They "burst" out a little and will be white. I have to admit I got a lump in my throat when I saw its eyeballs, but it was mind over matter. This week it was just my Mom, Adam and I that got to enjoy this feast. None of us really knew how to eat a whole fish, so we just dug right in, avoiding anything close to the head at all costs! Make sure you are careful for bones, especially the little, sharp ones that can really cut you. Just chew slowly and use your fork to "inspect" before you eat. I have to say, the fish was really delicious and Adam and my Mom agreed!! I still am not a HUGE fan of couscous but the salt, tomatoes and artichokes helped make it easier to eat. Adam, on the other hand, doesn't like couscous in any form or fashion, so a good substitute for this recipe would be rice or even cheese grits. So overall, I can now eat a whole fish without apprehension and enjoy it! Although, I still prefer the headless, skinless, boneless kind!
Recipe Rating: Easy (all you do it stuff, season & cook)
Good Leftover: No more than 1 day old
Tip: Go into this recipe with an OPEN mind, you will be pleasantly surprised!
Stay tuned in 2 weeks- English Muffins
You can find the Red Snapper in Papillote recipe here:
http://www.foodnetwork.com/recipes/alton-brown/red-snapper-en-papillote-recipe/index.html


